Mountaineering Gear Guide – Upper Body Layering System
Staying comfortable throughout the major temperature swings found on any climb can be quite a challenge. Your upper body layering system forms the core of your temperature regulating options. Dialling in your kit to function from +50F and sunny to -20F with windchill takes careful preparation.
We hope this guide helps to demystify what each layer does and helps you select the right pieces to work together in a system for your next climb.
As you build your system keep in mind that a good upper body layer:
- Has a hood and long sleeves (mid-layer vests are the only exception)
- Has multiple uses in your system
- Is light and packable
- Will dry quickly if wet
- Fits well, but doesn’t restrict your natural movement
As a system your upper body layers must allow you to both be warm while sitting at a rest break for 30 minutes in extreme cold and stay comfortable and cool when you are moving fast and generating heat as you climb.
Your standard upper body layering system will likely contain 5-6 pieces:
- Base Layer
- Softshell/Windshirt
- Mid Layers (2 for colder climbs)
- Rain Jacket
- Down Parka
Upper Body Layering System Starting Point – Base Layer
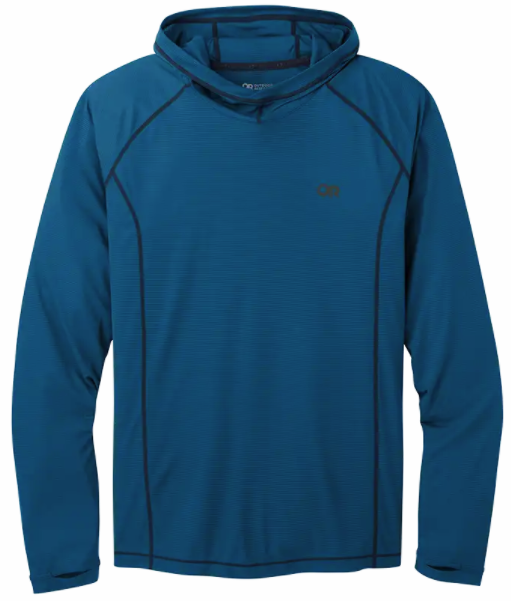
Your base layer is the foundation for all your layering. You may be wearing it for weeks at a time, so having a comfortable, functional, base layer is important. Remember that you can always add layers, but you can only take off clothing down to the base layer without exposing your skin to the harsh mountain sun so you want it to be good quality.
For almost all climbs we elect to keep the upper body layering as light as possible, focusing on sun protection rather than warmth. Bring other layers to provide warmth in your system. A lightweight sun hoody with long sleeves has proven to be the perfect all-around choice to wear on 90% of climbs. When temperatures rise, pull everything off except your sun hoody and remain comfortable hiking in full sun and +60 degree temps, all the while keeping arms, neck, and ears covered to prevent sunburn.
Wool and synthetic are both popular materials for your base layer and you may develop a preference for one over the other. Synthetic is great as it remains comfortable next to the skin even after days of sweating. Wool, particularly merino is unique in that it absorbs odor caused by bacteria which means you can wear it for longer without having to worry about your aroma! Beware cheaper wool will itch, whereas high quality merino is soft to wear but it can be expensive.
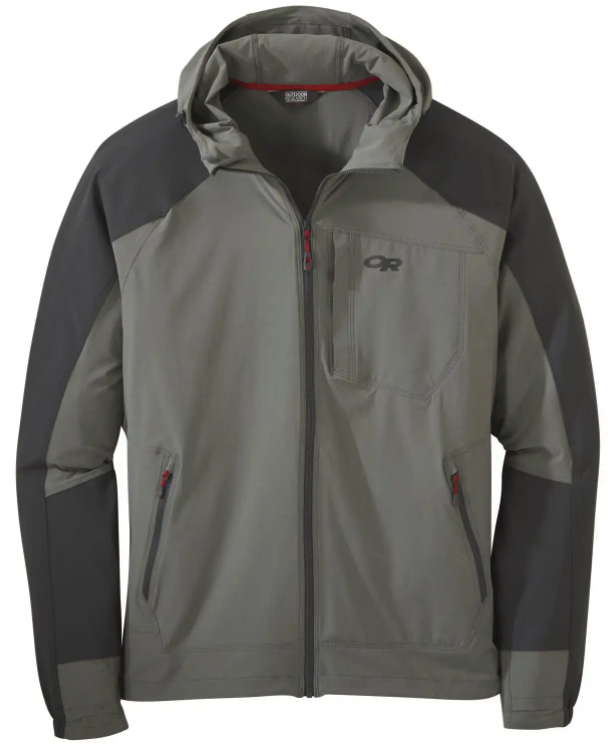
Softshell Jackets
Softshell jackets are simply a long sleeve (preferably hooded) jacket made out of a windproof, tightly woven, material with a water repellant coating – the “softshell” material. These jackets block the wind, add a bit of warmth, and repel light wind/precipitation while remaining breathable. These are a staple in your upper body layering system.
There are a ton of softshell jackets on the market, whatever brand you choose I recommend purchasing a light (thin) softshell over a thicker, warmer model. Keeping your softshell light works in conjunction with your light baselayer to round out your warm-weather system. Often it can be hot and sunny, but the wind whipping through just a baselayer is a bit too cold for comfort. Throw on a light softshell to cut the wind and you can keep moving without overheating.
Softshells, used properly, can be your secret ingredient to constant comfort. Taking a break in mild temps and don’t want to cool down? Add the softshell over your base layer and keep the heat in while letting your perspiration wick away. Feeling comfortable in a mid-layer and it starts misting? Put the softshell over your mid-layer to protect it from the wet without adding a ton of warmth. One mid-layer not quite warm enough, but your big puffy or second mid-layer will cause you to overheat? Add in that softshell as a half-step warmth adjustment.
Bringing a solid softshell also lets you keep climbing in light rain, wet snow, or high winds without throwing on your less-breathable rain jacket on during high-output activities.
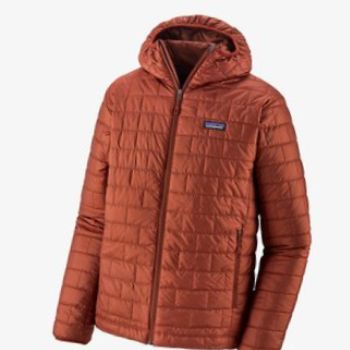
Mid Layers
Mid layers are the start of your cold-weather system. You need to stay at the appropriate temperature throughout the day in order to maximize your output and metabolic efficiency. Climbing through daily temperature swings means you will need to adjust your insulation every few hours or as you ascend/descend in altitude.
Mid-weight layers provide warmth at a low weight cost and build the versatility of your system. I often climb with 2 mid-layers of slightly different warmth levels. I can select the right jacket for the current temperature and when temps really drop I can pair them together to stay even warmer without necessarily bringing out my down Parka, which often becomes too hot to move in.
While fleece jackets have been popular for their warmth and relatively low cost, I tend to steer away from them as they don’t cut the wind, absorb water without drying quickly, and tend to be on the heavy side. My preference are light weight puffy jackets with a slick nylon exterior and either synthetic or down insulation. Insulation on midweight jackets are usually ½ inch (1 cm) to ¾ of an inch thick (2 cm). The nylon exterior fully cuts the wind allowing the insulation to provide warmth even in harsh conditions.
Lean towards synthetic insulation in your mid-layers as you will likely want to wear them just above freezing when precip can come as snow or rain. A synthetic jacket will still add warmth even when wet (& dries quickly) while a down jacket becomes a heavy useless lump and won’t regain full loft (& therefore warmth) until tumbled in a dryer. Sure synthetic doesn’t pack quite as small a may weigh a hair more than an equivalent down option, but considering how you will use this mid layer synthetic is a better option.
Make sure your mid-layers have a hood that is built to go over your helmet. Jackets without hoods aren’t nearly as versatile as jackets with hoods while mountaineering.
Vests are an option here for one of your mid-layers (if you like them & you’re bringing two) but you should have at least one long sleeve mid-layer jacket on every climb even if you bring a vest.
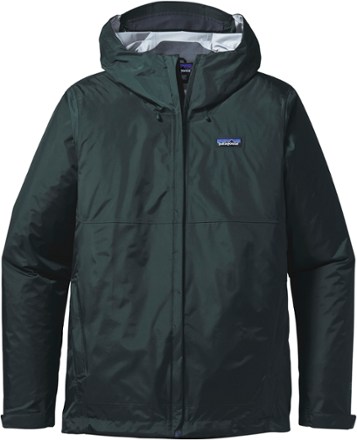
Rain Jacket
Waterproof/Breathable rain shell (or “Hard Shells”) technology has come a long way in the last 15 years. Gone are the days of only trusting Gore-Tex as many brands have developed their own membranes with equally reliable performance. You can spend $150 on a rain jacket, or $600 on a rain jacket and the quality of the membrane doesn’t change. What does change are all the little details that make a jacket great for the mountains, or just passably ok.
Construction
Rain jackets are constructed with the membrane sandwiched between an inner and outer layer. The outer layer of all jackets will be some form of tightly woven synthetic material coated in a Durable Water Repellency (DWR). The type of exterior fabric is what determines much of the jacket’s performance and durability.
When you pay more for a jacket you’re mainly paying for 2 things:
1) Higher quality/more durable exterior fabric and DWR and
2) Attention to detail in design/quality control.
The Lingo
Marketing forces in jackets have created their own complicated lexicon for what is actually just a few simple differences – lets clear this up.
- Waterproof Breathable Membrane – The heart of your jacket. This is the technology filled layer makes modern jackets great. Water vapor inside the jacket condenses on the membrane and capillary action brings it to the exterior of the jacket where it either evaporates off, or runs off with the rest of the rain from outside. There are some jacket fabrics (like eVent) that let water vapor through without condensing, but most function as described above. Gore-Tex, h2No, PreCip, etc are all just proprietary names for each company’s membrane.
- 2.5 layer Vs. 3 layer – Alright, now we get to dive into the “inner layer” of a rain jacket’s construction. Next to your body the rain jackets have either a spray on-coating (2.5 layer), or a piece of fabric (3 layer) meant to assist with wicking moisture into the membrane. Both will keep you equally dry from the outside, but the full 3 layer construction is less “sticky” against bare skin and does speed up the wicking process a bit making the jacket slightly more breathable. Additionally, the 3 layer jacket will last longer as the spray on coating tends to rub off after a season or two of hard use. Read rain jacket descriptions carefully and look for hidden tidbits like “inner fabric” (3 layer) or “permeable coating” (2.5 layer) to really tell whats going on. Next time you’re at your local gear store unzip a few jackets and look/feel the inside layers – you’ll quickly notice the difference.
What to look for:
All good rain shells for mountaineering share a few common traits
- Helmet compatible hood
- velcro at the wrists
- Waterproof zippers (with or without flaps to cover the zipper)
- A zipper that zips above the neck and almost up to your nose
- Pockets situated slightly higher than most jackets – letting you zip and unzip while wearing a hipbelt
- Long-cut waist. Not a trenchcoat style, but long enough that when you bend down the back of the jacket still covers the top of your pants
Proper fit
You want your rain layer to fit comfortably even when you are wearing every other upper body layer EXCEPT your big puffy. Think of climbing in rain/snow when the temperature is just a degree above freezing. You’ll have your baselayer, softshell, and mid layers on for warmth, and need your rain shell over all of them to stay dry. Layer up and head to your local gear store to test fit different brands. Raise your arms straight up in the air – the bottom of the jacket should still be below your hips. Hunch forward to round your back and then pull your arms across your chest like your hugging yourself – The jacket shouldn’t bind too tightly on your shoulders.
Bottom line – A 3 layer jacket, properly fitted, with the features described above will serve you best.
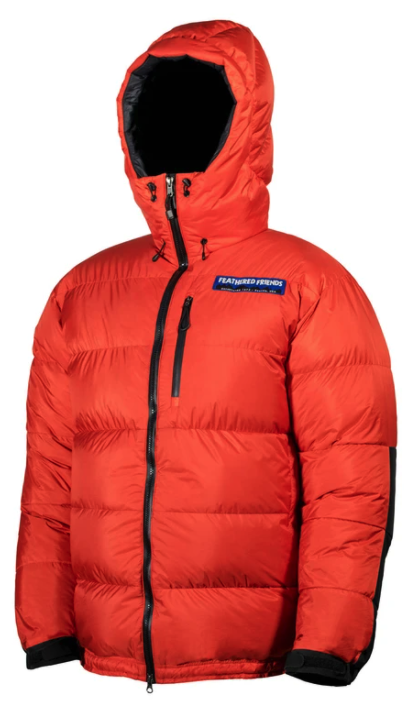
Down Parka
Your expedition down jacket serves two main purposes. First to keep you toasty on summit day and comfortable while hanging out in camp when temperatures drop and second it will keep you warm if something goes sideways and you’re stationary on the side of the mountain for hours at a time. Your Parka is your “oh sh*t” jacket and needs to be close to hand at all times.
It’s almost always better to have a Parka that’s too warm for the climb than too light. Think of it as your “Relax and Rescue” piece. Even traditionally warm climbs require a very warm Parka for safety. If in doubt, bring a bigger parka!
Insulation
Down is king for big parkas. There are a few synthetic jackets on the market that are plenty warm, but often synthetic choices are heavier and bulkier. Unlike the mid-layer, you’ll only bring out the big parka when temps are low enough that all precipitation freezes, so your down getting wet shouldn’t be an issue.
Down Fill Power, Explained
When selecting a proper parka it’s easy to be misled by the “fill count” of the down. Fill count has no bearing on the actual warmth of the jacket – it’s simply a measure of how much “loft” one ounce of down provides measured in cubic inches. 700 fill down will loft to a volume of 700 cubic inches per 1 ounce, while 900 fill down will loft to 900 cubic inches per 1 ounce. Thus the higher the fill power, the lighter the jacket can be for equivalent warmth it offers.
Instead of relying on fill power remember that the thickness of the jacket is actually what determines its insulative value. A thicker jacket, say 2.5-3 inches (6-8 cm), of 700 fill down will be warmer than a 1.5 inch (4 cm) 900 fill jacket.
Construction, Baffled Jackets VS Sewn-Through Jackets
Down will clump and slide down due to gravity unless it’s held in place. To solve this issue down jackets are quilted with seams of stitching every few inches to trap the down in little pockets to keep the down from sliding down to the bottom of the jacket. There are two processes to quilt jackets, sewing straight through, or baffling.
Sewn-through jackets stitch the inner and outer fabric shells together forming a pocket for the down that tapers down to just 2 layers of nylon where the stitching goes through. This leaves lines of relatively un-insulated material across the jacket, these lines become cold spots when the temperatures really drop. A thick jacket with sewn-through construction can be great for moderately cold climbs such as Ecuador Volcanoes or Elbrus, but won’t be warm enough for colder expeditions like Aconcagua, Vinson, or Denali.
A baffled jacket solves the cold-spot issue by building an extra piece of material between the inner and outer fabrics allowing the down to fully loft and spread the inner and outer layers apart. This allows consistent insulation around the entire jacket. Baffled jackets are more labor-intensive to sew and therefore more expensive, but on cold climbs, it’s worth every cent. Don’t compromise here.